What is the process of sending a replacement battery to SUMATOTEK Service Center?

A. If you have a faulty Sumatotek Lithium Battery which you want to send for replacement, please follow the below steps to ensure you get the fastest service.

  1. Note down the Serial Number/Barcode of the Battery. You can find the Barcode/Serial Number of the Battery on the sides of the battery & on the Warranty Card of the Battery. Take a picture of the Serial Number.
  2. Search for & take a photo of the Warranty Card with visible Serial Number/Warranty Card.
  3. Search for the original invoice of your product. It will be required for warranty claim.
  4. As mentioned on the Warranty Card, customers need to register for warranty at the time of purchase. They will receive a confirmation of their successful warranty registration on their mail. Keep in mind that you cannot register your battery for warranty 15 Days after the date of purchase. In case you do register after 15 days, the registration wont be accepted.
  5. Raise a Ticket on our SUMATOTEK Support Page. Don’t forget to mention correct Serial Number/Barcode on the ticket. This step is very important as without a ticket your battery even if received at our service centre wont be processed for replacement until a ticket is raised. The product may also get lost without a valid ticket number or without a valid serial number.
  6. Stick a label on the battery with the correct ticket number, your name, contact details and then courier/drop the battery at our service centre. Once you send the battery to our service centre you are bound by our Warranty Policy & Service Policy as mentioned on our website.
  7. If you want to send a charger, raise a separate ticket for charger or clearly mention the serial number of the charger in the ticket raised for the battery. Without a separate ticket for charger or serial number of the charger in the ticket the charger could get lost and Sumatotek wont be liable for any such loss.
  8. If you are sending the product by courier, do not forget to mention the tracking number on the ticket. Sending such details on Whatsapp or over phone may result in loss of product or non receiving of the product. A copy of the intimation can be sent over Whatsapp for faster response.
  9. Always send by courier/transport which can deliver directly to the Service Center. A receiving is must to validate that the product has indeed been received by the Service Center. You can also ask the Service Executive to arrange pickup for you. Any loss or damage during transit is not the responsibility of the Service Center. The customer is requested to add an insurance before shipping the product to & from the Service Center. The insurer’s terms & conditions shall apply for such damage claims.
  10. All reports will be uploaded on the ticket & any objection to any step in the process can be replied to on the ticket. No other forms of communication will be considered an official mode of communication with the SUMATOTEK Service Center.

    Warnings :
  11. SUMATOTEK Service Center does not hold any responsibility for any lost material even after receiving the battery if the serial number mentioned on the Ticket is incorrect.
  12. In case of Water damage cases all proofs will be uploaded on the corresponding ticket to which the customer must reply or visit for any objection within 7 days. Post which any objection wont be considered.
  13. Any material shipped to & from us is the liability of the customer during transit unless insured by an insurance company.
  14. Charger if sent with the material must be informed with serial number on the ticket. Without any prior information no claims of said chargers will be processed.

Q. My SUMATOTEK Lithium Battery is giving less than rated mileage, what should I do ?

A. If your SUMATOTEK Lithium Battery is giving less than rated mileage then here are a few things you can do before you take your battery to the service centre. Keep in mind that degradation is a natural process and cannot be reversed by any means.

Answer these questions before you check the steps below :

  1. When did you purchase the battery
  2. How much old is your battery in months
  3. Do you use the complete capacity of the battery daily / Do you discharge the battery completely daily ?
  4. Do you ride alone or with 2 or more passengers on a regular basis?
  5. When was the last time you serviced/balanced your battery?
  6. Do you regularly accelerate the vehicle at higher speeds or driver roughly?

    Once you have answered these questions then you can proceed to reading the steps below.
  1. Tyres should be filled to the desired tyre pressure level. A lower tyre pressure will lower the mileage of a vehicle.
  2. The wheels of the vehicle should be able to run freely when no power is connected. If the brakes are constantly applied upon the wheels even without the user braking the vehicle, it can result in more than desired current draw from the battery which will lower the mileage.
  3. If any component of the vehicle, controller, converter or motor is faulty then it may consume extra current. This can be checked simply by checking whether they over heat during use, since any unused current will be translated to heat and will lower the vehicle’s mileage.
  4. Also remember than the rated mileage is stated for single rider at low speeds, so in case you are riding at a speed higher than the rated speed and with 2/3 passengers or with extra load then it is very normal to get a mileage that is lower than the rated mileage.
  5. Also if you are using the battery for a long period of time then you can expect a natural decrease in the battery overall mileage due to the natural detoriation of the battery health over time.
  6. If you haven’t used the battery for a long time or even when a new battery leaves from the factory, remember to use it for a few cycles before you can get the maximum mileage out of the vehicle. Storing a battery for a long time lower its output capacity which can easily be restored in cases of lithium batteries by charging & discharging it for a few cycles.
  7. In winter , you can expect a less than rated mileage since lithium batteries give less than rated output capacity at low temperatures. So if you are experiencing this then this is a normal experience & your battery could be absolutely fine provided it doesn’t have a damaged BMS or an internal faulty cell which can be checked by following the steps below.
  8. If the Battery is being charged to the optimum level or whether it reaches the upper cutoff voltage level of the battery as mentioned in the product specifications. Batteries may not full charge due to a lot of reasons including a faulty charger, faulty BMS or even a cell failure inside the battery. Try changing the charger to check whether a different charger solves our issue. If not then proceed to the next step.

    Upper Level Battery Cutoff Voltages are :
    1. 54.6V for a 48.1V (13S) Battery
    2. 67.2V for a 59.2V (16S) Battery
    3. 71.4V for a 62.9V (17S) Battery
    4. 84.0V for a 74.0V (20S) Battery
    Please note that the actual battery voltage could be a few millit-volts lower than the rated Upper Cutoff Battery Voltage.
  9. Discharge the battery completely to check the Lower Level Voltage Cutoff of the battery, the Lower level Voltage Cutoff of the battery should be as per the product specifications mentioned in the product description. If the battery cuts off at a voltage higher than the rated Lower Cutoff Voltage then there might be an issue with the BMS or an internal cell failure.

    Upper Level Battery Cutoff Voltages are :
    1. 39-41V for a 48.1V (13S) Battery
    2. 48-50V for a 59.2V (16S) Battery
    3. 51-53V for a 62.9V (17S) Battery
    4. 60-63V for a 74.0V (20S) Battery
    Please note that the actual battery voltage could be a few Volts higher(depending on the load applied) than the rated Lower Cutoff Battery Voltage.
  10. Finally measure the Individual row Voltage of a Battery Pack. If you dont know how to do so, you can learn on how to check individual row/string voltages of a battery pack by clicking on the link. Enter these values in the Battery Health Calculator and analyse the reports. A % of Unbalance below 1% indicates a good state of health & even if the mileage issue persists then the BMS could be at fault, but always remember to check whether the BMS is overheating or whether there is any difference in voltage before or after the BMS terminals, if the BMS also seems fine then recheck the steps above & re-analyse. Above 1% State of unbalance indicates a possible failure in any cells within the pack.

Q. How to check the string /individual row voltage of a SUMATOTEK Lithium Battery Pack?

A. Lets take an example of a 48.1V SUMATOTEK Lithium Battery. It has 13 Strings or 13 Rows connected in series. The BMS connector in the picture has 14 wires. You can access this connector by opening the Battery Box Cabinet Cover and after disconnecting it from the BMS. Remember to follow the Safety Instructions given at the end of this FAQ.

C0 : This is also the negative terminal terminal of the Battery Pack. It is also connected internally to the BMS at B- Terminal.

C14 : This is also the positive terminal of the Battery Pack. It goes straight to the output terminals & is also accessible via the Industrial & Charging Connectors. Note : The Main Red(+Ve wire : 4Sq mm ) is directly connected to the connectors. It is not connected to the BMS.

C1, C2, C3, C4, C5, C6, C7, C8, C9, C10, C11, C12, C13 : These pins are connected to individual rows in the pack.

Our task is to measure the voltage between these pins. If you are using SUMATOTEK Service Battery Health Calculator to analyse your battery health report then you need to measure B0, B1, B2, B3, B4, B5, B6 ,…..B20.

B1 : Voltage Between C0 & C1. If you are using a multimeter (Set the Multimeter to 20V DC Setting) then the Negative Lead(Black Lead) will be placed on C0 & Positive Lead(Red Wire) will be placed on C1. Note down this Voltage, it should be within a range of 0-5V.

B2: Voltage Between C1 & C2. If you are using a multimeter (Set the Multimeter to 20V DC Setting) then the Negative Lead(Black Lead) will be placed on C1 & Positive Lead(Red Wire) will be placed on C2. Note down this Voltage, it should be within a range of 0-5V.

B3: Voltage Between C2 & C3. If you are using a multimeter (Set the Multimeter to 20V DC Setting) then the Negative Lead(Black Lead) will be placed on C2 & Positive Lead(Red Wire) will be placed on C3. Note down this Voltage, it should be within a range of 0-5V.

B4: Voltage Between C3 & C4. If you are using a multimeter (Set the Multimeter to 20V DC Setting) then the Negative Lead(Black Lead) will be placed on C3 & Positive Lead(Red Wire) will be placed on C4. Note down this Voltage, it should be within a range of 0-5V.

B5: Voltage Between C4 & C5. If you are using a multimeter (Set the Multimeter to 20V DC Setting) then the Negative Lead(Black Lead) will be placed on C4 & Positive Lead(Red Wire) will be placed on C5. Note down this Voltage, it should be within a range of 0-5V.

Keep repeating it until you reach ……………………….

B13: Voltage Between C12 & C13. If you are using a multimeter (Set the Multimeter to 20V DC Setting) then the Negative Lead(Black Lead) will be placed on C12 & Positive Lead(Red Wire) will be placed on C13. Note down this Voltage, it should be within a range of 0-5V.

SAFETY INSTRUCTIONS : Do not short the Connector Pins while measuring with the multimeter leads. If the leads touch each other while they are placed on the BMS Connector pins, it could short that particular string/row. Also do not press the Multimeter lead too hard while measuring the voltages, press gently or it might damage the connector. Do not bend or twist the connector in any way while taking it out from the BMS. Pull the connector out slowly in the direction of the connector.

Q. My Sumatotek Charger keeps on charging my Sumatotek Battery for hours and yet the Battery doesn’t full charge? What should I do?

A. First, of all check your average charging duration using our Charging Calculator on our website. You have to select the Ah (Capacity of the Battery) & the A(Ampere) of the Charger.
For eg for a 60V 6A Charger & a 60V 25Ah Battery, Ah value is 25 & A value is 6. When you select these 2, you get the expected charging duration.
Incase your charger is charging for more than the expected charging duration, then check your input supply voltage. In areas, with low input voltages, charging could be slow. Also make sure you don’t use very long extension cables to charge the scooter. It could result in a drop in current output & voltage output.

Even after following all these steps, the charging durations is more than the expected charging duration, you should visit your nearest service centre and look for a replacement. Your charger might be giving less current output than what is rated on the charger.

Q. What should I do if my Sumatotek Battery has been damaged by Liquid/Water?

A. If your SUMATOTEK Lithium Battery has come in contact with water, please take it immediately to your nearest dealer and inform him of the same. If you do not take action immediately and wish to delay or not report the incident to the dealer it may damage your SUMATOTEK Lithium Battery permanently. The dealer will take immediate action and ensure that the water doesn’t stay inside the battery. He will open the battery and dry it completely from inside out. He may also need to send the battery immediately to the SUMATOTEK Company Service Center for a thorough checkup. Keep in mind, Fast Action may save your battery. But if you do not report it then the damage due to water retained inside the battery will be permanent and your battery may not be repairable.

NOTE : Once water goes inside the battery by any means, intentional or accidental your battery will be out of warranty but note that we will try our level best to repair it at a nominal cost after the permission of the customer and all charges are to be borne by the customer in that case.

Q. How to fix a loose BMS Connector issue in a SUMATOTEK Lithium Battery?

A. If you are facing one or multiple of the issues mentioned below then follow the simple steps mentioned below. We strongly recommend that you keep an experienced technician by your side or get your battery checked at your point of purchase.

1. After I connect the charger to my battery, the charger FAN or Charging Indicator doesn’t turn on. To put it simply: The Battery doesn’t charge.
2. After the installation of SUMATOTEK Lithium Battery, the vehicle display turns on but when I sit on the vehicle the motor is unable to run.

Tools Required: A Multimeter, A Screw Driver, A Smartphone.

Note : In case you are unable to follow STEP 1 you can directly follow STEP 2.


STEP 1 [ Test ]: Measure the voltage of the SUMATOTEK Lithium Battery when not connected to the vehicle. Note down the reading. It should be within the range( Between the Lower Cutoff & Upper Cutoff) specified in the individual products’ technical description. Now connect the SUMATOTEK Lithium Battery to the vehicle and turn on the MCB and the key. Again measure the voltage of the battery. If the voltage reading drops to 0Volts or less than 10Volts or below the Lower Cutoff(as specified in the product’s technical description), then you need to follow the next step mentioned below.

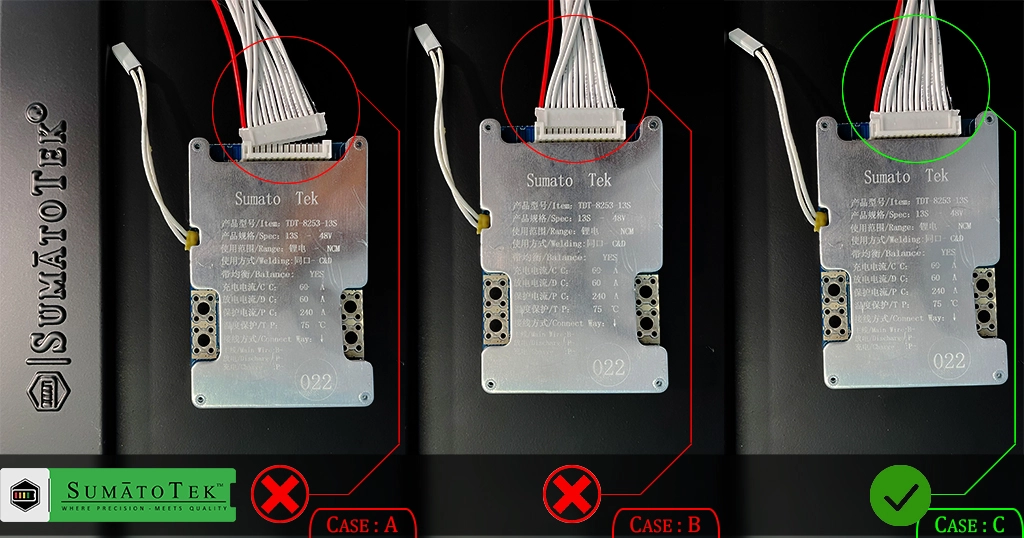
STEP 2 [ Solution ]: The Battery Pack is managed by a BMS (Battery Management System). The BMS has multiple wires connected to a connector which is connected to each row of the battery. It is highly likely that during transportation the connector as shown in CASE A & CASE B might have gotten loose.
Under the supervision of an experienced technician open the battery and simply reconnect the connector as shown in CASE: C . Pull the connector out carefully without bending it. Bending the connector can damage the connector pins by breaking the soldering points.

Note : Always makes a full single video while opening the battery. Follow the safety instructions mentioned in a similar FAQ about how to safely open the battery in case the need arises. The video will act as proof that you have followed all the guidelines regarding opening the battery as mentioned on our website.

BMS Connector Scenario Diagram

NOTE : Always take prior written permission of authorized SUMATOTEK representative over mail/Whatsapp for opening of SUMATOTEK Lithium Batteries. In case of lack of video proof or without any written permission, you may loose your warranty.